Saturday, August 15, 2020

Oracle ASM Commands


Oracle ASM Commands


ASM SQL * Plus commands


Start the ASM instance


$ export ORACLE_SID=+ASM

$ sqlplus '/as sysdba'


sql>startup


ASM instance started


Stop the ASM instance


$export ORACLE_SID=+ASM

$sqlplus '/as sysdba'

shutdown immediate


Adding Diskgroup


sql>create diskgroup oradg  external redundancy disk 'ORCL:VOL5';


Diskgroup created

sql>select  group_number,disk_number,mode_status,name from v$asm_disk;


sql>create diskgroup  disk_group_1 NORMAL REDUNDANCY  FAILGROUP failure_group_1 DISK

'/devices/diska1' NAME diska1,

'/devices/diska2' NAME diska2

FAILGROUP failure_group_2 DISK

'/devices/diskb1'NAME diskb1

'/devices/diskb2' NAME diskb2;


Drop a Diskgroup


Disk groups can be deleted using the DROP DISKGROUP statement


DROP DISKGROUP disk_group_1 INCLUDING CONTENTS;


Adding disks to existing groups


Disks can be added or removed from disk groups using the ALTER DISKGROUP statement


wild cards can be used to reference disks resulting strings does not match a disk already used by an existing disk group


Add disk


ALTER DISKGROUP disk_group_1 ADD DISK


'/devices/disk*3'

'/devices/disk*4';


Drop a Disk


ALTER DISKGROUP disk_group_1 DROP DISK diska2;


Resizing Disks


Disks can be resized using the RESIZE clause of the ALTER DISKGROUP statement .the statement can be used to resize individul disks ,all data in a failure group or all 


disks in the disk group ,if the SIZE class is ommitted the disks are resized to the size of the disk returned by the os


Resize a specif disk


ALTER DISKGROUP disk_group_1

RESIZE DISK diska1 SIZE 200G;


Resize all disks in a failure group


ALTER DISKGROUP disk_group_1

RESIZE DISKS IN FAILGROUP failure_group_1 SIZE 200G;


Resize all disks in a diskgroup


ALTER DISKGROUP disk_group_1

RESIZE ALL SIZE 200G;


Manually Mounting asm diskgroups


Manually Disk groups are mounted at  ASM instance startup and unmounted at ASM instance shutdown ,mounting and dismounting will be done using ALTER DISKGROUP statement


ALTER DISKGROUP ALL DISMOUNT;

ALTER DISKGROUP ALL MOUNT;

ALTER DISKGROUP disk_group_1 DISMOUNT;

ALTER DISKGROUP disk_group_1 MOUNT;


Drop file inside ASM


Files are not deleted automatically they created by using alias names as they are not OMF(Oracle managed files)

when ever a recovery happens point of time before the file was created  for this scenearios manullay deleted the file


Drop file using an alias


ALTER DISKGROUP disk_group_1 DROP FILE '+disk_group_1/my_dir/my_file.dbf';


Drop file using a numeric from  filename


ALTER DISKGROUP disk_group_1 DROP FILE '+disk_group_1.245.3';


Drop file using a fully qualified file name


ALTER DISKGROUP disk_group_1 DROP FILE'+disk_group_1/mydb/datafile/my_cs.369.3';


Checking Metadata


Check metadata for a specific file


ALTER DISKGROUP disk_group_1 CHECK FILE '+disk_group_1/my_dir/my_file.dbf';


Check metadata for a specific failure group in the disk group


ALTER DISKGROUP disk_group_1 CHECK FAILGROUP failure_group_1;


Check metadata for a specific disk in the disk group


ALTER DISKGROUP disk_group_1 CHECK DISK diska1;


Check metadata for asll disks in the diskgroup


ALTER DISKGROUP disk_group_1 CHECK ALL;


Rebalancing


Rebalancing speed is controlled by the ASM_POWER_LIMIT initialization parameter setting to 0 will disable disk rebalancing


ALTER DISKGROUP data REBALANCE POWER 12 WAIT;


Converting a database to ASM


Ensure the database is using SPFILE and not PFILE (it about time after all)set parameters on the target database


for eg :if we set both DB_CREATE_FILE_DEST and DB_RECOVERY_FILE_DEST  we should get mirrored control files and duplexed log files by default


sql> alter system set DB_CREATE_FILE_DEST='+DATA'

sql>alter system set DB_RECOVERY_FILE_DEST_SIZE= 20G;

sql>alter system set DB_RECOVERY_FILE_DEST='+RECOVER';

sql>alter system set CONTROL_FILES='+DATA';


start the database in NOMOUNT mode and restore the control file into the new location from the old location


RMAN>connect target/

RMAN> STARTUP NOMOUNT;

RMAN>RESTORE CONTROLFILE FROM 'old_control_file_name';


Mount the database and copy the database into the ASM disk group;


RMAN>ALTER DATABASE MOUNT;

RMAN> CONFIGURE DEVICE TYPE DISK PARALLESISM 6;

RMAN>BACKUP AS COPY  DATABASE FORMAT '+DATA';


Switch all datafiles to the new ASM location and open the database


RMAN>SWITCH DATABASE TO COPY;

RMAN>ALTER DATABASE OPEN;


Add new tempfiles and drop the old tempfiles


sql>alter tablespace temp add tempfile;

sql>alter database tempfile '-' DROP;

sql>select * from dba_temp_files;


optionally move SPFILE into ASM


sql>CREATE SPFILE '+DATA' FROM PFILE;


Move redo log files into ASM for each group


sql>ALTER DATABASE DROP LOGFILE GROUP 1;

sql>ALTER DATABASE ADD LOGFILE GROUP 1 SIZE 200M;


logfile is active and cannot be dropped issue an aaALTER DATABASE SWITCH LOGFILE ; command and try again


Convert a tablespace to ASM


ensure the database is in archive log mode and from rman


connect target;

sql "alter tablespace TSNAME offline";

backup as copy tablespace TSNAME to copy;

sql "alter tablespace TSNAME online";

exit;


Convert a datafile to ASM

ensure the database is in archive log mode and from rman


connect target;


sql "alter database datafile '--' offline";

backup as copy datafile'-- 'format '+DATA';   

switch datafile '--' to copy;

sql "alter database datafile '--' 'online";

exit;


Create new tablespace on ASM


CREATE TABLESPACE my_ts DATAFILE '+disk_group_1'SIZE 200M AUTOEXTEND ON;


Note :Info on  Oracle asm commands it may be differ from your environment prod,test,dev


THANKS FOR VIEWING MY BLOG FOR MORE UPDATES FOLLOW ME


Oracle ASM Background process

 Oracle ASM Background process


Introduction


Like Database we have background processes like SMON,PMON,DBWR,CKPT and LGWR similarly our ASM have some background processThe Background process starts while instance started in NoMount stage


1)RBAL : RBAL runs in both database and ASM instances.In the database instance,it does a global open of ASM disks,in an ASM instance,it also  coordinates rebalance activity for disk groups .RBAL(Rebalance),The primary function of this background process is to open all disks listed under  each disk group and to make them available to the various clients .Apart from this RBAL back ground process also creates a rebalance plan to move extents,between the disks when a disk is added to the disk group or removed from a existing disk groups 


2)ARBn: The ARBn performs the actual rebalance data extent movement in aan automatic  storage management instance,there can be many of these process running at a time ,named,ARB0,ARB1and so on .


3)ASMB: ASMB runs in a database instance that is using an ASM disk group,ASMB communicates with the ASM instance managing storage and providing statastics ,ASMB can also runs in the ASM Instances ,ASMB runs in ASM instances when the ASMCMD Commands runs or when the database Instance first starts in the spfile is stored in the ASM instance


4)GMON: GMON maintains disks membership in ASM disk group, the process is responsible for managing the disk level activities  (drop/off -line) and advancing disk group compatibility


5)MARK: The MARK allocation unit (AU) for resync coordinator ,MARK processes coordinates  the updates to the registry,when the disks go offline,this process runs in the RDBMS instance and is started only when disks go off-line in ASM redundancy disk groups


6)Onnn: One or more slave process forming a pool of connections to the ASM instance for exchanging message


7)PZ9x: these processes slave processes where  xis a number ,used in  fetching data on behalf of GV$queries


8)VKTM: This VKTM process is used the fast timer and has the same functionality in the RDBMS instances


Background process search in UNIX


ps-ef |grep asm


THANKS FOR VIEWING MY BLOG FOR MORE UPDATES FOLLOW ME 


Friday, August 14, 2020

Oracle ASM


Oracle ASM

Introduction:


Oracle introduced ASM (Automatic storage management) with 10 g version ,ASM is a logical volume Manager owned by oracle and it helps to create logical volumes on physical disks to store the database and its components and  it widely used in Real Application Cluster,ASM is built on OMF,ASM acts as a buit in oracle volume manager by handling striping and mirroring functions ,previously managed by third party tools,is a Poratable volume manager to manage pool of shared disks,ASM is an instance not a database will have separate SGA and set of bg process.

Raw Devices


OCFS2 ----->Orcale clusterd File system


ASM------->Automatic Storage Management


is a part grid of infrastructure software in 10g ,we have separate home for ASM installed from 11g, one single home for clusterware and ASM with grid infra home


eg : /u01/app/11.2.0/grid

     /u01/app/12.2.0/grid


Manages oracle data files (eg:DATA) spreads data across disks for faster performance and work load balance 


Note: Oracle recommends to manage with  minimum 4 disks for each disk group,supports online disks reconfiguration and rebalancing provides adjustable rebalncing speed,for every node,we have ASM instance default installed while grid software

rac1 --->+ASM1

rac2---->+ASM2


ps -ef |grep pmon


To view the information in grid will usse performance views with gv$


gv$session

gv$process

gv$instance

gv$database


for finding information on every instance using global/grid views


number of nodes -4

 node-1

 node-2

 node-3

 node-4


Number of ASM Instances :4(eg: +ASM1,+ASM2,+ASM3,+ASM4)

Number of ASM Instance on each node :1(eg: on rac1,+ASM1)

Number of RDBMS Instances :3  prod,dev.test

Number of RDBMS Instances on each node :3(prod1,dev1,test1)

Each database number of instance on 4 node? 4

eg:2dbs,each db has 4 instances if 4 nodes

prod(DB)-->prod1,prod2,prod3,prod4(Instances)

Test(DB)--->test1,test2,test3,test4


eg:


3 databases in a cluster


rac1----> +ASM1,prod1,dev1,test1

rac2---->+ASM2,prod2,dev2,test2


sql>select inst_id,instance_number,host_name,status from gv$instance;


grid infrastructure

clusterware|ASM

cluster--clusterware

storage--ASM--automatic storage management


Linux/oradata-->dbfiles--->managed linux os--->notshared--->single instance accessed


rac1

rac2

rac3

rac4

access-->shared storage across multiple nodes/server with in a cluster


asmdisk1,asmdisk2 -disk1,disk2--drivers--asmdrivers--boot/list

p1

p2

p3

p4

p5

one more cluster -it own his shared storage ASM is a volume manager to manage pool of disks 

using logical storage unit as disk group associated with one or more physical disks


two disk groups


DATA--->dbfiles,redo,controfile,spfile,ocr,vote

FRA---->archives,backupsets


min 4 disks avail for each disk group


DATA---->asmdisk1,asmdisk2,asmdisk3(3 dsiks)can add more

FRA ----->asmdisk4,asmdisk5(2 disks)


online---->add disk without downtime spreads data across disks forfatsre performance can be rebalanced by adding disks/removing disks


ASM is an instance,not a database on everynode,default one ASM instance runs/starts on a clusterware startup


connect and verify the instances status of every node with in a cluster from any one single instance using gv$instance


select inst_id,instance_name,instance_number,status from gv$instance;


number of rdbms instances on 4 nodes


rac1-->prod1,dev1,test1

rac2--->prod2,dev2,test2

rac3--->prod3,dev3,test3

rac4--->prod4,dev4,test4


including ASM -->overall on a 4 node cluster with 3 database 3 rdbms*4 nodes=12 inst+4 ASM=16 instances


Log in to asm


Tools 

asmca - configuration assistant

ascmd - command line


$asmcmd

mkdir

cp

ls

mv

du


xhost +

su - oracle

.grid_env

$asmca


create diskgroups/add disks/drop disks

mount diskgroups/Dismount diskgroup/local


Oracle recommends to manage with min three diskgroups


DATA - datafiles,redo,control,ocr,voting disk

FRA - fast recovery area - rman,archives,flashback logs,redo

,control files

Each diskgroup may have one or more disks


Brief few views in ASM


v$asm_file

v$asm_diskgroups

V$asm_disks

v$asm_operation

v$asm_disk_stat

v$asm_client


sql>select hot_used_mb,cold_used_mb,free_mb,total_mb,name,label,path from v$asm_disk;


sqlplus '/as sysasm'


SQL> SELECT name, free_mb, total_mb, free_mb/total_mb*100 as percentage FROM v$asm_diskgroup;


How to configure ASM diskstring to discover the disks while boot?


sql>alter system set asm_diskstring='/dev/oracleasm/disks/*' sid='*' scope=spfile;

Note: sid='*'  to apply in every instance with in a cluster.


SQL> alter system set asm_diskgroups=DATA sid='*';


Mounting diskgroups in ASM


sql>alter diskgroup all mount;

ASM - DiskGroups


set wrap off

set lines 155 pages 9999

col "Group Name" for a6    Head "Group|Name"

col "Disk Name"  for a10

col "State"      for a10

col "Type"       for a10   Head "Diskgroup|Redundancy"

col "Total GB"   for 9,990 Head "Total|GB"

col "Free GB"    for 9,990 Head "Free|GB"

col "Imbalance"  for 99.9  Head "Percent|Imbalance"

col "Variance"   for 99.9  Head "Percent|Disk Size|Variance"

col "MinFree"    for 99.9  Head "Minimum|Percent|Free"

col "MaxFree"    for 99.9  Head "Maximum|Percent|Free"

col "DiskCnt"    for 9999  Head "Disk|Count"


prompt

prompt ASM Disk Groups

prompt ===============


SELECT g.group_number  "Group"

,      g.name          "Group Name"

,      g.state         "State"

,      g.type          "Type"

,      g.total_mb/1024 "Total GB"

,      g.free_mb/1024  "Free GB"

,      100*(max((d.total_mb-d.free_mb)/d.total_mb)-min((d.total_mb-d.free_mb)/d.total_mb))/max((d.total_mb-d.free_mb)/d.total_mb) "Imbalance"

,      100*(max(d.total_mb)-min(d.total_mb))/max(d.total_mb) "Variance"

,      100*(min(d.free_mb/d.total_mb)) "MinFree"

,      100*(max(d.free_mb/d.total_mb)) "MaxFree"

,      count(*)        "DiskCnt"

FROM v$asm_disk d, v$asm_diskgroup g

WHERE d.group_number = g.group_number and

d.group_number <> 0 and

d.state = 'NORMAL' and

d.mount_status = 'CACHED'

GROUP BY g.group_number, g.name, g.state, g.type, g.total_mb, g.free_mb

ORDER BY 1

/

------------------------------------------------------

ASM - Disk in Use

-----------------------------------------------

prompt ASM Disks In Use

prompt ================


col "Group"          for 999

col "Disk"           for 999

col "Header"         for a9

col "Mode"           for a8

col "State"          for a8

col "Created"        for a10          Head "Added To|Diskgroup"

--col "Redundancy"     for a10

--col "Failure Group"  for a10  Head "Failure|Group"

col "Path"           for a19

--col "ReadTime"       for 999999990    Head "Read Time|seconds"

--col "WriteTime"      for 999999990    Head "Write Time|seconds"

--col "BytesRead"      for 999990.00    Head "GigaBytes|Read"

--col "BytesWrite"     for 999990.00    Head "GigaBytes|Written"

col "SecsPerRead"    for 9.000        Head "Seconds|PerRead"

col "SecsPerWrite"   for 9.000        Head "Seconds|PerWrite"


select group_number  "Group"

,      disk_number   "Disk"

,      header_status "Header"

,      mode_status   "Mode"

,      state         "State"

,      create_date   "Created"

--,      redundancy    "Redundancy"

,      total_mb/1024 "Total GB"

,      free_mb/1024  "Free GB"

,      name          "Disk Name"

--,      failgroup     "Failure Group"

,      path          "Path"

--,      read_time     "ReadTime"

--,      write_time    "WriteTime"

--,      bytes_read/1073741824    "BytesRead"

--,      bytes_written/1073741824 "BytesWrite"

,      read_time/reads "SecsPerRead"

,      write_time/writes "SecsPerWrite"

from   v$asm_disk_stat

where header_status not in ('FORMER','CANDIDATE','PROVISIONED')

order by group_number

,        disk_number

/

------------------------------------------------------

ASM - File Types in Diskgroups

-----------------------------------------------


Prompt File Types in Diskgroups

Prompt ========================

col "File Type"      for a16

col "Block Size"     for a5    Head "Block|Size"

col "Gb"             for 9990.00

col "Files"          for 99990

break on "Group Name" skip 1 nodup


select g.name                                   "Group Name"

,      f.TYPE                                   "File Type"

,      f.BLOCK_SIZE/1024||'k'                   "Block Size"

,      f.STRIPED

,        count(*)                               "Files"

,      round(sum(f.BYTES)/(1024*1024*1024),2)   "Gb"

from   v$asm_file f,v$asm_diskgroup g

where  f.group_number=g.group_number

group by g.name,f.TYPE,f.BLOCK_SIZE,f.STRIPED

order by 1,2;


------------------------------------------------------

ASM - Instances currently accessing these diskgroups

------------------------------------------------------

prompt Instances currently accessing these diskgroups

prompt ==============================================

col "Instance" form a8

select c.group_number  "Group"

,      g.name          "Group Name"

,      c.instance_name "Instance"

from   v$asm_client c

,      v$asm_diskgroup g

where  g.group_number=c.group_number


------------------------------------------------------

ASM - Assigned ASM disks and their paths

------------------------------------------------------


prompt Assigned ASM disks and their paths

prompt ==============================

col "Disk Size"    form a9

select header_status                   "Header"

, mode_status                     "Mode"

, path                            "Path"

, lpad(round(os_mb/1024),7)||'Gb' "Disk Size"

from   v$asm_disk

where header_status in ('MEMBER')

order by path


------------------------------------------------------

ASM - Free ASM disks and their paths

------------------------------------------------------


prompt Free ASM disks and their paths

prompt ==============================

col "Disk Size"    form a9

select header_status                   "Header"

, mode_status                     "Mode"

, path                            "Path"

, lpad(round(os_mb/1024),7)||'Gb' "Disk Size"

from   v$asm_disk

where header_status in ('PROVISIONED','FORMER')

order by path

/

------------------------------------------------------

ASM -  ASM disks and their paths

------------------------------------------------------


prompt  ASM disks and their paths

prompt ==============================

col "Disk Size"    form a9

select header_status                   "Header"

, mode_status                     "Mode"

, path                            "Path"

, lpad(round(os_mb/1024),7)||'Gb' "Disk Size"

from   v$asm_disk

where header_status in ('MEMBER','PROVISIONED','CANDIDATE','FORMER')

order by path

/

------------------------------------------------------

ASM - Current ASM disk operations

------------------------------------------------------


prompt Current ASM disk operations

prompt ===========================

select *

from   v$asm_operation

/


views

-----

v$asm_operation

v$asm_disks

v$asm_diskgroups

v$asm_file

v$asm_client

v$asm_disk_stats


-- Check ASM diskgroup built on raw devices

set pages 50000 lines 120

col path for a15

select a.path,b.NAME from v$asm_disk a, v$asm_diskgroup b

where a.GROUP_NUMBER=b.GROUP_NUMBER and

a.path like '%raw%' ;


--check how the different disks of the diskgroups are utilized

select

        instname,

        dbname,

        group_number,

        failgroup,

        disk_number,

        reads,

        writes

from v$asm_disk_iostat

order by 1,2,3,4,5,6

/

set pages 50000 lines 120

col path for a30

select disk_number,

mount_status,

header_status,

mode_status,

state,path

from v$asm_disk ;


set pages 50000 lines 120

select path,redundancy,total_mb,free_mb,failgroup from v$asm_disk where mount_status='CACHED' and header_status='MEMBER' and mode_status='ONLINE' and state='NORMAL'order by path;


Note : to mount diskgroup - use


sql>alter diskgroup all mount;


or specific diskgroup.

list from v$asm_diskgroup(name,state)

then

sql>alter diskgroup DATA mount;


Note: For ASM Instance , Will start and mount the diskgroups.

No DB will open or there in ASM.

gv$instance (instance_name,status)


using asmca - asm configuration assistant

To create diskgroup/adding/removing disks.


#xhost + 

$su - oracle

$. grid_env

$asmca


Click on tab ( disk group)

-> Create/mount/dismount


Diskgroup Name : FRA

External

Choose - Disk2

AU - 4

Versions - 11.2.0.0.0

Ok


-? Adding disks : 

righ click on diskgroup

then

choose - add disk.

Note : in FRA - fast recovery area

holds - backup sets,redo,control

archivelogs.

oracle recommends to manage with min two asm diskgroups.

DATA - to hold datafiles

FRA - 


For every diskgroup , recommend with min 4 disks

for better performance with best practice.

with Allocation Unit (AU) - 4mb(best)

is a fundamental unit in which contiguous disk space is

allocated to asm files.

default - 1 , can have 2,4,8,16,32,64


To dismount - Diskgroups

-----------------------------

right click - dismount on local node

      or

      Dismount on all nodes

Dropping a diskgroup

-------------------------

right click - drop diskgroup


Creating Diskgroup

------------------

sql>CREATE DISKGROUP fra EXTERNAL REDUNDANCY  DISK 'ORCL:DISK2';

sql>select name,state from v$asm_diskgroup;

SQL> alter diskgroup FRA dismount;

sql>select name,state from v$asm_diskgroup;

SQL> alter diskgroup FRA mount;

sql>select name,state from v$asm_diskgroup;

SQL> DROP DISKGROUP FRA INCLUDING CONTENTS;


Mounting/Unmounting disk group.

--------------------

SQL>alter diskgroup FRA mount;

SQL>alter diskgroup FRA dismount;

sql>alter diskgroup all mount;

sql>alter diskgroup all dismount;


Dropping Diskgroup:

-------------------------

SQL> DROP DISKGROUP FRA INCLUDING CONTENTS;


Add Disk 2

--------------

sql>CREATE DISKGROUP OCRvote  EXTERNAL REDUNDANCY  DISK 'ORCL:DISK2';

sql>ALTER DISKGROUP DATA ADD DISK 'ORCL:DISK2';

sql>select * from v$asm_operation; (on another terminal - monitor)


-- Drop a disk. if two disks are there

sql>ALTER DISKGROUP DATA DROP DISK DISK2;

sql>select * from v$asm_operation;


With wait - using runtime rebalance

--------------------------------

ALTER DISKGROUP DATA ADD DISK

      'ORCL:DISK2'

       REBALANCE POWER 2 WAIT;


How to check consistency for metadata for all disks ?

ALTER DISKGROUP DATA CHECK ALL;


Drop Diskgroup using force.

---------------------------

If unable to mount ,use force

SQL> DROP DISKGROUP OCRVOTE FORCE;


ALTER DISKGROUP DATA ADD DISK

'/devices/diska5' NAME diska5,

'/devices/diska6' NAME diska6,

'/devices/diska7' NAME diska7,

'/devices/diska8' NAME diska8;

=========================================

Creating of Diskgroup with Normal redundancy


CREATE DISKGROUP DATA NORMAL REDUNDANCY

   FAILGROUP fg1 DISK '/devices/diskg1'

   FAILGROUP fg2 DISK '/devices/diskg2'

   QUORUM FAILGROUP fg3 DISK '/devices/diskg3'

   ATTRIBUTE 'compatible.asm' = '11.2.0.0.0';


ALTER DISKGROUP data1 ADD DISK

      '/devices/diskd*'

       REBALANCE POWER 5 WAIT;


Explain With or with out rebalance operation while adding disk?


With out -


With option - then it runs with rebalance 5 and does not return until the rebalance operation is complete.

----------------------------------------------------------

The size support by Type of redundancy

Each Diskgroup supports - size.

------------------------------

External - Supports up to 140PB from 11.1

           till 10.1 - 16TB

Normal -   11.1 -? 23PB

           10.1 -? 5.8TB

High   -  11.1 -? 15PB

           10.1 -? 3.9TB 


ASM_POwer_limit supports up to 1024 

--------------------------------------------------


ASM Commands - interactive mode.

-----------

$asmcmd


chdg Changes a disk group (add, drop, or rebalance).

chkdg Checks or repairs a disk group.

dropdg Drops a disk group.

iostat - Displays I/O statistics for disks.

lsattr - Lists the attributes of a disk group.

lsdg - Lists disk groups and their information.

lsdsk - Lists disks Oracle ASM disks.

lsod - Lists open devices.


md_backup - Creates a backup of the metadata of mounted disk groups.

md_restore - Restores disk groups from a backup of the metadata.

mkdg - Creates a disk group.

mount - Mounts a disk group.


The attribute can be set with SQL, ASMCMD, or ASMCA.


Brief few views to find information in ASM


v$asm_disk - Disk Utilization

v$asm_diskgroup

v$asm_client

v$asm_file

v$asm_disk_stat

v$asm_operation - For finding rebalacing status while add/remove disks


Tasks - ASM

-----------

Adding Diskgroup

Adding Disk to a Diskgroup

Dropping Disk

Dropping Diskgroup

Monitoring rebalancing operation

mounting/dismounting - diskgroups

ASM Instance - start/stop/status - using srvctl / sqlplus


Oracle recommends to manage with min two diskgroups.

DATA - to store datafiles,spfile,ocr/voting. ( while cluster install)

FRA - to store controlfiles,redo,archives,backupsets

OCRVOTE - to store ocr/vote if multiplexing.


asmca 

asmcmd


Changing parameter in cluster nodes

use sid='*' to effect/change in all nodes of a cluster.


NON ASM to ASM

RAC Files 


----------------------------------

For Deinstalling - DB

Bring up cluster on all nodes  - verify status

su - oracle

. db_env

cd $ORACLE_HOME/deinstall

./deinstall

Accept the inputs...done.

---------------------------------

NOn asm - to ASM

deinstall Database

Bring down cluster services,crs

On rac1 , 

su - oracle

. db_env

/database/

./runInstaller

here choose file system(not asm)

dbname - prod

/oradata

sqlplus '/as sysdba'

shutdown immediate

----------------------------

ASM 

instance


. grid_env

export ORACLE_HOME=/u01/app/11.2.0/grid/bin

export ORACLE_SID=+ASM1


Tools

----

asmca - configuration assistant - create diskgroups/drop / add disks/drop disks/mount/unmount

asmcmd - command line interpreter to manage files/diskgroups


ASM Views - brief information of ASM file/disks/diskgroups/status

----------------------------------------------------------

v$asm_file

v$asm_diskgroups

V$asm_disks

v$asm_operation

v$asm_disk_stat

v$asm_client


ASM - Tasks


Monitor the usage of the diskgroup 

Allocate disks to the diskgroup

Monitor rebalancing activity when disk was added/removed

List of diskgroups

list of files in diskgroup and its usage

diskgroup status - mounted/unmounted/online

Disks Provisioned/former/member - online/offline - status


Note: info on oracle ASM it my be differ from your environment production,development,testing 


THANKS FOR VIEWING MY BLOG FOR MORE UPDATES FOLLOW ME


Wednesday, August 12, 2020

NFS Server on Linux


NFS server on linux

-----------------------

Network file system 


Introduction

---------------

NFS stands for network file system is a distributed file system protocol allows user on a client computer to access files over a computer network,Linux can be both NFS server and NFS client machine it means that it can export file system  to other systems and mount file systems exported from other machines


Configuring NFS server

----------------------------


Let us start the process

---------------------------


Step -1:  Install NFS server 


use the following command to install the NFS server


sudo apt -get update -y

sudo apt - get install nfs-kernel-server


sudo yum update -y

sudo yum install nfs-utils nfs-utils-lib -y


Step-2: Create a directory called  /nfs_share


mkdir /nfs_share


Step -3: edit the file /etc/exports and add the following line


vi /etc/exports


/nfs_share *(rw,sync)


/nfs_share - directory to be shared


*- clients allowed  to accessthe share,you can restrict it by ip address ,for example ,you could ,instead of the asterik,put 192.168.0.0/24 to restrict the clients on the network


rw - read and write acsess


sync - sync the disk before command completion


Step -4: Now run the exportfs command to export the directory


exportrf -avr


-a -----> exports or un -exports all directories

-r------> re-export all directories

-u------->un -exports one or more directories

-v--------> provides verbose output


Step-5: Resatrt the services and make it permanaent


sudo service nfs restart


sudo systemctl restart nsf


if you want NFS to start at boot ,use the following command


chkconfig --levels 235 nfs on


sudo systemctl enable nsf


Configuring NFS client

----------------------------

Step-1: install nfs package on the client machine


sudo apt -get update -y

sudo apt -get install nfs-common -y


yum install nfs-utils nfs-utils-lib -y


Step-2: Start the service


sudo service nfs restart

sudo chkconfig --levels 235 nfs on


sudo systemctl start nsf

sudo sytemctl enable nsf


Step-3: Show mount Command to view exportson an NFS server


showmount -e 192.168.10.03


Step-4: Make a Directory and mount NFS over it


mkdir /nfs_data

mount -t nfs 192.168.10.03 :/nfs_share /nfs_data


Step -5: Make it permanaent mount


edit  /etc/fstab and add the following line


vi  /etc/fstab


192.168.10.03:/nfs_share  /nfs_data nfs defaults  0 0


Once it mounted ,you can able to view the contents of the exported  files /directory locally


THANKS FOR VIEWING MY BLOG FOR MORE UPDATES FOLLOW ME 


Tuesday, August 11, 2020

Samba Server in Linux


Samba Server in Linux

Introduction


Samba  is the free software re-implementation of the common internet file system (CIFS) also known as the SMB protocol,Microsoft clients will use this protocol to access files located on your linux/unix Server just as if it were a native windows server,Samba allows file and print sharing between computers running microsoft windows and computers running unix,samba uses the smb network protocol(server message block) which is used by windwos systems to communicate with each other to share files on the same network using Samba linux systems map drive to windows systems ,windows systems map drive to linux systems,samba is an useful networking tool for anyone  who has both windows and unix systems on his network running on a unix system ,it allows windows to share files and printers onthe unix host,and it allows unix users to acess resources shared by windows systems 


Configuring Samba Sever

let us Start the Process


Step1: Install samba package  (Update pacakage lists and install samba package using following commands)


sudo apt update -y


sudo apt install samba -y


sudo yum update -y


sudo yum install samba* -y


Step2:One installed ,make directory and assign full permissions


mkdir /samba_share


chmod 777 /samba_share


Step 3:  Check the context of the directory and change it to according to samba


ls -ldZ /samba_share


drwxrwxrwx. root  root unconfined_u:object_r:default_t:s0 /samba_share/


chcon -t samba_share_t /samba_share/


ls -ldZ /samba_share/


drwxrwxrwx. root root unconfined_u:object_r:samba_share_t:s0 /samba_share/


Step 4: Create auser or use existing use who will be allowed to login in as samba use


smbpasswd -a smbuser

new SMB password:

retype new SMB password:

added user smbuser.


todelete a use from samba,use smbpasswd -x username


To check all the samba users


pdbedit -L


Step 5:Open configuration file and add/modify the following lines


vi /etc/samba/smb.conf


[fileshare]

comment = Public Stuff

path = /samba_share

public = no

valid users = smbuser

writable = yes

printable = no

host allow = 192.168.1.0/24


host allow -network range or host range


Step 6: Test the samba parameters


testparm


Load smb config files from /etc/samba/smb.conf

rlimit_max: increasing rlimit_max (1024) to minimumwindows limit (16384)

Processing section "[homes]"

Processing section "[printers]"

Processing section "[smbshare]"

loaded services file OK.

Server role:ROLE_STANDALONE

press enter to see adump of your service definitions


[printers]

comment = All printers

path =/var/spool/samba

printable = Yes

print ok =Yes

browseable = No


[fileshare]

comment = Public Stuff

path = /samba_share

valid users = smbuser

read only = No

hosts allow = 192.168.1.0/24


Step -7 : Restart the samba and nmb services


sudo services smb restart

sudo chkconfig smb on


sudo service nmb restart

sudo chkconfig nmb on


sudo systemctl restart smb

sudo systemctl  enable smb


sudo sytemctl restart nmb

sudo systemctl enable nmb


Windows as client: To connect samba server ,right click onmy computer and select map network drive


Give the address of the samba server and click on finish button to continue


When properly configured,it wil prompt for username and password and you can see the files and you can add the files to samba server


THANKS  FOR VIEWING MY BLOG FOR MORE UPDATES FOLLOW ME


Saturday, August 8, 2020

Oracle Databasae Architecture


Oracle Databasae Architecture

----------------------------------------

Introduction

------------------

An oracle databse is a collection of data treated as a unit,The purpose of database is to store and retrieve related information, a database server is the key to solving the problems of information management,in general , aserver reliably manages large amount of data in a multiuser environmemnt so that many users can concurrently access the same data, all this is accomplished while delivering high performance.A database server also prevents unauthorized acess and provides efficient solution for failure recovery


     Oracle database is the first database designed for enterprise grid computing, the most flexible and cost efective way to manage information and applications. Enterprise grid computing create large pools of industry standard ,modular storage and servers,with this architecture,each new system can be rapidly provisoned from the pool of components there is no need for peak workloads,because capacity can be added or reallocated from the resources pools as needed Defines the components of database software database is the to store data in terms of files database can be used in these sectors

Banking

Insurance

Oil

Retails

Real estate

Airlines

Payment gateways

Govt Sectors

private setors

   The Database has a logical structures and physical structures.Because the physical and logical structures are separate,the physical storage of data can be managed without affecting the acess to logical storage structures,Oracle is an RDBMS (Relational database management systems),The oracle RDBMS stores data logically in the form of tablespaces and physically in the form of data files,the oracle database architecture can be described in terms of logical and physical structures,The advantage of separating the logical and physical structure is that the physical storage structure can be changed without affecting the logical structures.


Physical structure: The physical layer of the database consists of three types of files


One or more datafiles


two or more redolog files


one or more controlfiles


DataFiles(.dbf files): Data files stores the information contained in the database.one can have as few as one datafiles or as many as hundreds of data files.The information for a single table can span many datafiles or many tables can share a set of datafiles,the number of data files that can be configured is limited by the oracle parameter db_files, to stores permanent data


Redo Log Files(.log): Oracle maintains logs of all the transaction against the database,These transactions are recoreded in files called online redo log files(Redo logs) The main purpose of the redo log files is to hold information as recovery in the event of system failure,redo log stores a log of all changes made to the database the redolog files must perform well and be protected against hardware failures (through software or hardware fault tolerance).if redolog information is lost,one cannot recover the system when a transcation occurs in the database,it is entered in the redo log buffers,while the data blocks affected by the transactions are not immediately written to disk,in an oracle database there are at atleast three or more redolog files,oracle  writes to redolog files in a cyclical order i.e after the first log file is filled ,it writes to the second log file,untill that one is filled .when all the redo log files have been filled,it returns to the first log file and begin overwrite its content with new transaction data.note if the database is running in ARCHIVELOG mode,the database will make a copy of the online redolog files before overwriting them


Control Files (.ctl): control files record control information about all of the files with in the database,control files contain information used to start an instance, such  as the location of the datafiles and redologfiles ,oracle needs this information to start the database instance.control files must be protected,oracle provides a mechanism for storing multiple copies of control files,These multiple copies are stored on as separate disks to minimize the potential damage due to disk failure,the names of the database conntrol files are specified via the CONTROL_FILES initilization parameter. The control file is small binary file the contents of the control files are database name,time stamp creation of database,location of datafiles and redo log files,


checkpoint information of every record (dml)with scn number (system change number)

The parameter file defines the characterstics of an oracle instance.for example ,it contains parameters that size some of the memory structures in the SGA

The password file authenticates user privileged to start up and shutdown an oracle instance

The archived redo log files are offline copies of the redolog files that may be necessary to recover from media failures


sql> select name,value from v$ parameter;

sql> select name,bytes,1024/1024,autoextensible from dba_data_files;


Instance(service )startup ,shutdown

---------------------------------------


A database instance(also save as server) is set of memory structures and background process that access a set of database files,constitutes of memory structure and background process every database has one or more instancess,database running in one server has one instance,if multiple servers (RAC) will have mltiple instances


Instance = memory+Bg process


eg: host1 prod(dbname-sid)prod(instance)


sid: system identifier is the instance name


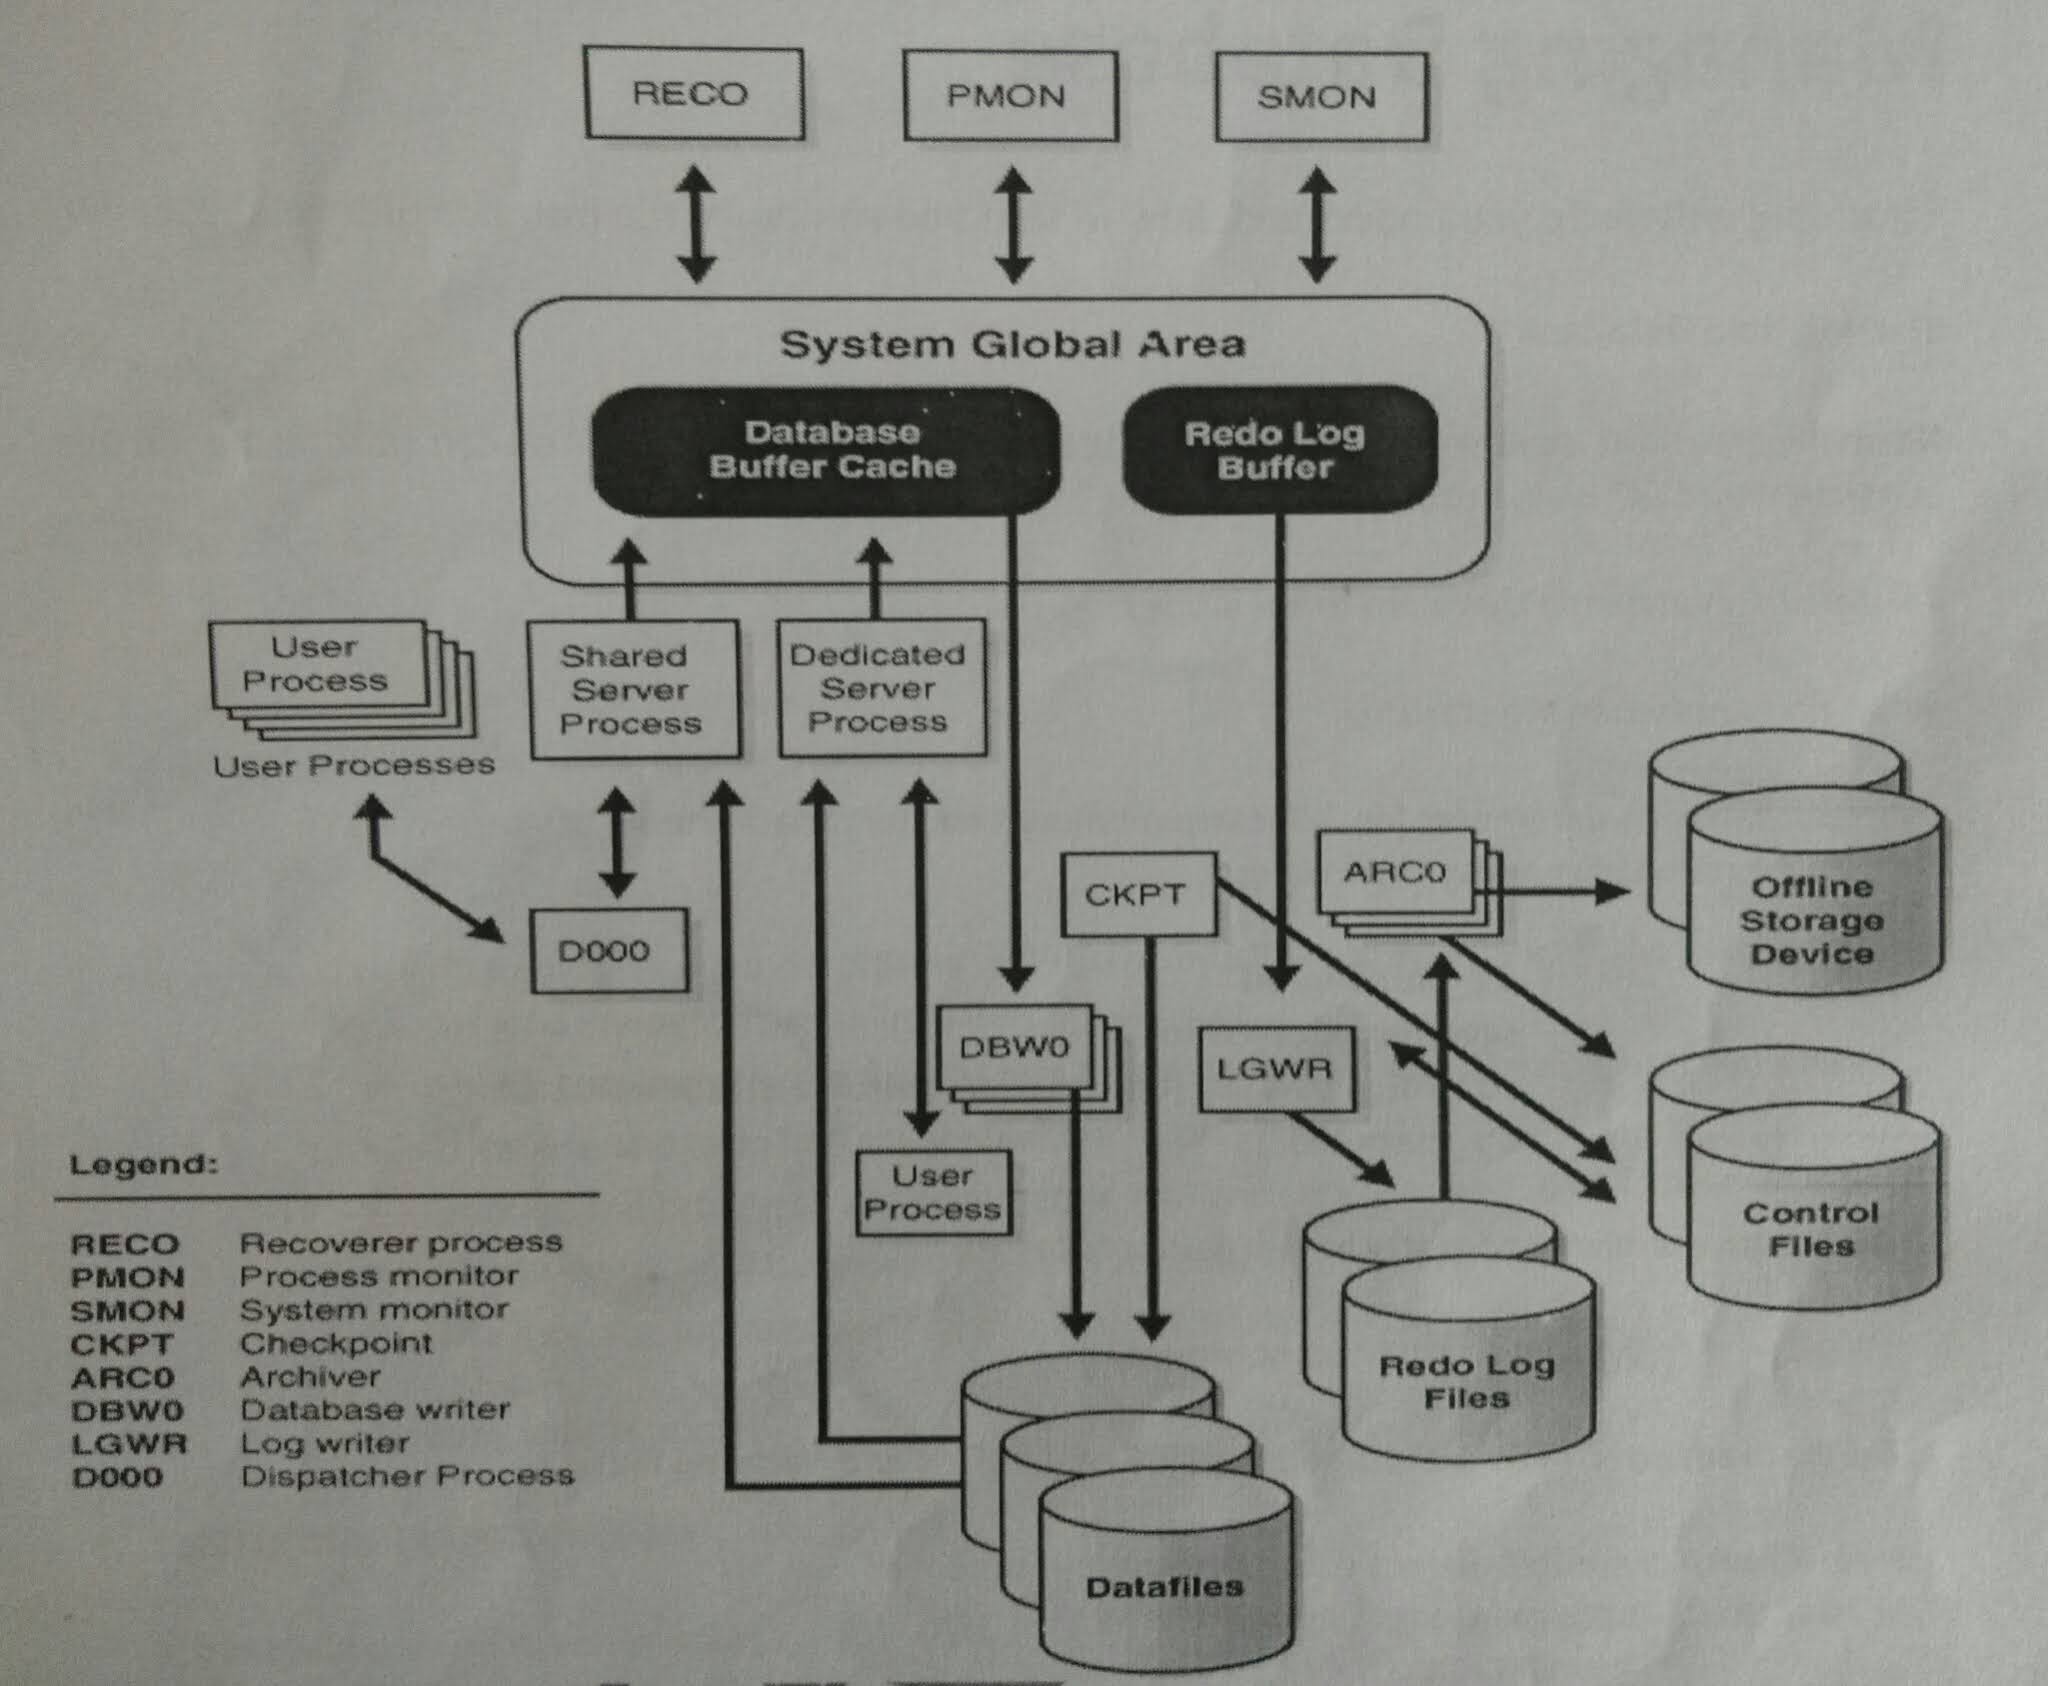
Memory Structure is divided into SGA and PGA


SGA: The SGA is also called the shared global area it is used to store database information that is shared by database process,it contains data and control information for the oracle server  and is allocated in the virtual memory of the computer where oracle resides, oracle uses an area of shared memory called the shared global area(SGA) The SGA is a shared memory region that contains data and control information for one oracle instance oracle allocates the SGA when an instance starts and de-allocates it when the instance shutdowns,every instance has the sga ,the entire SGA should be large as possible to increase the system performance and to reduce disk i/o.


From 11g ,oracle introduced Automatic memory management (AMM) using two parameter control instance memory with


SGA is set with parameter  SGA_MAX_SIZE


sql> show parameter sga_max_size (from 11g is et to zero -amm is enabled)


Memory_max_target


memory_target


RAM(64g)> memeory_max_target(60g)>=memory_target(35g-dynamic)>=sga+pga


with in the size of memory_target,oracle server distributes across sga and pga


If memory_target is set to non zero value with in the size of memory_max_target 


If memory _target>0 (AMM is enabled -->without restart dynamic)


memory_max_target>0 (static--need restart)


memory_target=0(AMM is disabled), then dba ha s manually allocate memory for sga and pga


chaitanyaoracledba blog


The information is stored in the SGA is divided into three memory structures


1)Database buffer cache 


2)Redo Log buffer


3)Shared Pool


1)Database buffers cache: The database buffer stores the most recently used blocks of data.The set of database buffers in an instance is the database buffer cache,the  buffer cache contains modified as well as unmodified blocks,because the most recently and most frequently used data is kept in memory.it improves the performance of system by reducing the i/o operations

2)Redo Log Buffer: The redo log buffer stores redo entries .these are log of changes made to the database in database buffer cache.The redo entries stored in the redo log buffers are written to an online redo log,an online redo log is a set of two or more files that record all the changes made to oracle data files and control files.

Data buffer cache: holds modified as well as unmodified blocsks most recently used (MRU) willbe kept and Least recently used (LRU) willbe written into files


oracle uses MRU and LRU algorithm


sql> show parameter db_cache_size

0 - amm is enabled


Log Buffer cache: Holds log of changes made against to database for recovery purpose in the event of system failure every 1/3 or 3 secs fills will write in online redolog files


sql> show parameter log_buffer

 1m /6m max value -recommended


3)Shared Pool : The shared pool is used to store the most recently execeuted sql and plsql statements and the most recently used data definition


it consits of two key performance related memory structures


Library cache: Library cache stores information about the most recently used sql and pl/sql statements,enables the sharing of commonly used statements,it is 


managed by the least recently used (LRU) algorithm


Data dictionary cache: The data dictionary cache is a collection of the most recently used definitions in the database,holds dictionary inforamtion of tables,indexes,users,permissions


sql>show parameter shared_pool_size

0 (If AMM is enabled) also we can give fixed value with in the size of memory_target


Program Global Area:

----------------------------


 PGA is a memory buffer that contains data and control inforamtion for a server process,A server process is a process that services a client reqeuests.A PGA is created  by oracle when a server process is started.theinformation in a PGA depends on the oracle configuration,The PGA area is non shared area of memory created by oracle when a server process is started ,the basic difference between SGA and PGA is PGA is cannot shared between multiple processes in the sense that is used only for requirements of a particular process whereas the SGA is used for the whole instance and it is shared.


chaitanyaoracledba blog


Back ground process

---------------------------

Few background process writes or read into file and memory, the trace files are only created whenthere is any problem,some of the background process are


PMON: PMON stand Process monitor and this is database backround process cleans up failed user process also relases dead locks, cleaning up the cache and freeing resorces that the process was using (its effect can be seen when a proces holding a lock is killed

 $ ps -ef |grep pmon


SMON: SMON stands for system monitor and this is database background process performs instance receovery at the start of the database,SMON also cleans up temporary segments that are no longer in use and recovers dead transcations skippedduring crash and instance recovcery because of file read or offline errors .it coalesces combines contiguos free extents into large free extents 


 $ ps - ef |grep smon


system crash--->redologfiles---->smon--.startup---->recovery changes--->datafiles


LGWR:LGWR stands for Log writer background process manages the writing of the contents of the redo log buffer to the online redolog files,LGWR writes the log entries in the batches form,the redo log buffers entries always contain the most upto date status of the database note LGWR is the only one process that writes to the online redo log files and the only one that directly reads the redo log buffer during to the database  normal database operation, writes from redolog buffer to online redo log files every 1/3 rd or 3 sec fills


$ ps -ef | grep lgwr


DBWR:DBWR stand for database writer background process is responsible for managing the contents of the datablock buffer cache and dictionary cache,DBWR  performs batch writes of changed block,DBWR doest not need to write blocks blocks when a transcation commits,can have upto 20 process with parameter db_writer_process,DBWriter writes from buffer cache to data files in batch form not on every commit


$ ps - ef | grep dbwr


CKPT: CKPT stands for check point transaction all modified information in database buffer in the sga is written to the datfiles by a database write process (DBWR) This event indicates checkpoint,the checkpoint processis responsible for signalling DBWR at checkpoints and updating all the datafiles and controlfiles of the database, onec the DBWR writes in to the datafiles then signal to CKPT a checkpint process occurs,then the ckpt process update in a datafile header and control file with the 


SCN number (system change nmber for every record)


$ ps - ef | grep ckpt


number of instances running on a server


using ps - ef |grep smon


ps -ef |grep pmon 


ARCHIVER(ARCH): The archiver process reads the redo log files once oracle has filled them and writes a copy of the used redo log files to the specified archive log destinations actually ,for most databases,the ARCH has no effect on the overall system performance


MMAN: MMAN dynamically adjust the sizes of the SGA components ,it is a new process added to oracle 10 g as part of automatic shared memory management


FMON: The database communicates with the mapping libararies provided by the storage vendors through an external non oracle database process that is spawned by  a background process called FMON,FMON is responsible for managing and mapping information 


LMON:LMON stands for Lock manager process lock monitor is an oracle background process created when you start a database instance in RAC mode the LMON process manages global locks and resources,it is also called as global enqueue service monitor,it monitor all instances in the cluster primarily for dictionary cache locks and dead locks on dead locks sensitive equeues and resources,LMON also provides cluster group services


MMON: the oracle 10 g background process to collect statastics for the automatic workload repository (AWR)


MMNL:This process performs frequent and lightweight manageability relatedtasks such as session history capture and metrics computation

WMON: The Wake up monitorprocess


RVWR: Recovery Writer oracle starts the recovery writer (RVWR)process to write the flashback data from the flashback buffer to the flash back logs


CTWR:(change tracking writer) oracle tracks the physcical location of database changes in a new file called the change tracking file.oracle backup utility the recovery manager RMAN uses the change tracking file to determine which data blocks to read during an incremental backup,making the incremental backups faster by avoiding reading entire data files.

DMON:Dataguard


DIAG: the diagnosibility process DIAG runs oracle bug commands  and triggers  diagnostic dumps as part of the new ADR(automatic diagnostic repository )feature which is replacement and major enhancement for the much reviled RDA


SMCO: The space management cordinator and slaves perform space allocation and reclamation


THANKS FOR VIEWING MYBLOG FOR MORE UPDATES FOLLOW ME


vi editor in linux


vi editor in linux

-------------------

vi editor introduction

-------------------------

vi editor is a visual text editor ,the default editor comes with unix operating system,unix vi editor is a full screen editor ,two modes of operation command mode and insert mode ,vi editor is free and open source ,vi uses less amount of system resources,vi supports all programming languages and differnt file formats also,vi is interactive text editor that is display oriented,using vi you can insert text anywhere in the file very easily.


To launch the vi editor open the terminal 


vi <filename_new> or <filename_existing>


vi chaitanya.txt


vi editor commands

-----------------------


i----->insert at cursor (goesinto insert mode)


a----->writes after cursor (goes into insert mode)(append after cursor)


A------>write at the end of the line (goes into insert mode)(append after line)


esc---->terminate insert mode


u------>undo last change


U------>undo all changes to the entire line


o------> open a new line (goes into insert mode)


O ------> open a new line before current line


Deleting Text

-----------------


dd------>delete line


3dd-----> delete 3 lines


D------->delete contents of line after the cursor


c------->delete contents of line after the cursor and insert  new text .press esc key to end


d$ -----> deletes from the cursor to the end of the line


ndw ----->deletes the next n words starting with current


ndb -----> deletes the previous n words starting with current


ndd -----> deletes n lines begginning with current line ,suppose we want to delete 100 lines then 100dd


nmd ------>deletes lines n through m


Insertion

-------------

dw------>delete word


4dw------>delete 4 words


cw------->change word


x-------->delete character at the cursor


r-------> replace character


R-------> overwrite characters from cursor onward


s------->substite one character under cursor continue to insert


S------->substitute entire line and begin to insert at the begining of the line


~------> change case of individual character


:r ----->file reads file and inserts it after current line


:nr ----> file reads file and inserts it after line n


p -----> put after the position or after the line


P ------> put before the positionor before the line


Moving cursor with in a line

-------------------------------------

K ------>move cursor up


J------->move cursor down


h------->move cursor left


l------->move cursor right


w ------> move to the next word


W -------> move to the next blank delimited word


E--------> move to the end of blank delimited word


O or | ----> move to the beginning of the line


n| ------> moves to the column n in the current line


$ -------> move to the end of the line


1G -----> move to the firstline of file


G -------> move to the last line of the file


nG ------> move to the nth line of the file suppos eyou want to move to 100 th line then 100G


n ------> move to the n th line of the file


H ------> move to top of screen


nH -----> moves to nth line from the top of the screen


M ------> move to middle screen


Searching for Strings

-------------------------

/string -----> search forward for string like error


?string ----> search bak for string


n ------> search for next instance of string


N ------> search for previous instance of string


% ------> search to begining of balancing(){} []


?str ----> finds in reverse for str


/fmw_home  -----> search forward for fmw_home in the file


?fmw_home ------> search backward for fmw_home in the file


n ------>repeat previous search


N ------> repeat search in opposite direction


/.? -----> repeat search forward or backward 


Replace or substitution

-----------------------------

 The search and replace function is accomplished with the :s command. it is commonly used in combination with ranges or the  :g command(below)


:s/pattern/string/flags replace pattern with string accordingto flags


g Flag ---> repalce all occurances of pattern


c Flag ----> Confirm replaces


& Repeat last :s command


it can be used like this also 


:s,pattern,string,flags


:s^pattern^string^flags


:s^/oracle^/java^g  ----> This will replace /oracle with /java every where in the file 


s,^a,^b,g -----> this will replace  ^a with  ^b everywhere in the file


Saving and closing the File

---------------------------

shift++zz ----->save the file and quit


:w -----> save the file but keep it open


:w! -----> saves current file overriding normal checks but doesnt exit


:q ------> quit without saving


:q! -----> quits vi and without saving ifyou have done some mistake and want to quiy without making any changes


:e! ----->edits file discarding any unsaved changes(starts over)


:we! ----> saves and continues to edit current file


:wq-------> save the file and quit


Yanking Text

----------------

yy -----> yank the current line


:y -----> yank the current line


nyy or nY -----> places n lines in the buffer -copies


THANKS FOR VIEWING MY BLOG FOR MORE UPDATES FOLLOW ME 

ITIL Process

ITIL Process Introduction In this Blog i am going to explain  ITIL Process, ITIL stands for Information Technology Infrastructure Library ...