Thursday, September 24, 2020

YUM Package Management

YUM Package Management


Introduction:


In this Blog YUM Package Management i am going to explain,Install,Update,Remove,find packages,manage packages and repository in linux systems, YUM(YellowDog Updater Modified) is an open source command line as well as graphical based package management tool for RPM based linux/unix systems.

It is an GPL (General Public Licence) open source means any one can download and acess the code and fix the bugs and develop the customized pacakages ,and you will work only from Centos 5/Red hat and latest versions of fedora,for old release like RHEL 4,you need to use up2date command to update your RPM based packages


YUM PACKAGE MANAGEMENT,yum package manager,yum command,yum install,yum -y centos,yum install package,yum repository,yum install list of packages,what is yum,install yum,yum repository,yum -y centos,yum update,centos package manager,yum install package,download yum package manager,yum package manager,yum centos,yum update,yum install package,yum repository,yum command not found,yum vs rpm


Now Let us start the process :YUM Package Management


YUM uses the configuration file location will be


/etc/yum.conf


1.Install a Package 


To install a package called Firefox ,just run the below command it will automatically detect and install the dependencies for firefox package


[root@chaitanyaoracledba]# yum install firefox


The above command will ask the confirmation before installation any package on your system


If you want to install packages automatically without asking any confirmation ,use the option -y as shown in the below command


[root@chaitanyaoracledba]# yum -y install firefox


2.Remove a Package


To Remove a Package a completely with all  dependencies use below command 


[root@chaitanyaoracledba]# yum remove firefox


If you want to remove a package firefox with out asking confirmation use option -y in the below command


 [root@chaitanyaoracledba]# yum -y remove firefox


3.Update a Package


If your using the outdated version of  MYSQL package and you want to update the latest vesrion of MYSQL package just run the below command it will automatically resolves the all dependencies issues and install the package.


[root@chaitanyaoracledba]#yum update mysql


4.Install a Package Locally from a directory or cd rom


[root@chaitanyaoracledba]# yum localinstall finger -0.16.36.el6.i686.rpm


5.List a Package


Use the list function to search for the specific package with name .For Example if you want to search for a package called openssh use below command  


[root@chaitanyaoracledba]# yum list openssh


If you want to search more accurate specific version like example openssh-4.3p2 of the package,use the below command


 [root@chaitanyaoracledba]# yum list openssh-4.3p2


6.Search for a Package


If you dont rememeber the exact name of the package then use the search function to search all the available packages to match the name of the package you specified


 [root@chaitanyaoracledba]# yum search vsftpd


7. Information of a Package


If you want to know more information like name,arch,version,release,size,repo,summary,url,licence,description, about the package before installing it using the below command


 [root@chaitanyaoracledba]# yum info firefox


8.List All Available Packages


To list all the available packages in the Yum database ,use the below command


 [root@chaitanyaoracledba]# yum list | less


9.List All Installed Packages


To list all the installed packages on a linux systems,just type the below command it will display all the installed packages


 [root@chaitanyaoracledba]# yum list installed | less


10. Yum Provides Function


Yum provides a function is used to find which package a specific file belongs to for example if you would like to know the name of the package that is /etc/httpd/conf/httpd.conf


 [root@chaitanyaoracledba]# yum provides /etc/httpd/conf/httpd.conf


11. Check for all Available Updates


To find how many of installed packages on your system have updates available using the below command


[root@chaitanyaoracledba]# yum check -update


12. Update System


To keep your system up to date with all security and binary packages updates,run the below command it will install all the latest patches and security updates in your linux system


[root@chaitanyaoracledba]# yum update


13. List all Available Group Packages


In linux number of packages are bundled with particular group,Installed groups like  Adminsitration tools,DNS name server,dialup networking support,editors,engineering and scintific,FTP server,graphics,java deevelopment,legacy network server, And Available groups like Authorizing and publishing ,base beagle,cluster storage,clustering,development tools development libraries eclispse,KDE etc,instead of installing individual packages with yum ,you can install particular group that will install all the realted packages that belong to the particular group 


[root@chaitanyaoracledba]# yum grouplist


14. Install a Group Package


To install a particular package group, we use option as groupinstall. for example to install "MYSQL database" just type the below command


[root@chaitanyaoracledba]# yum groupinstall 'MySQL Database'


15. Update a Group Package


To update any existing installed group packages ,just type the below command


[root@chaitanyaoracledba]# yum groupupdate 'DNS Name Server'


16. Remove a Group Package


To Delete or Remove any existing installed group from the system,just type the below command


 [root@chaitanyaoracledba]# yum groupremove  'DNS Name Server'


17. List Enabled Yum Repositories


To list all enabled yum repository in your system ,just type the below command


 [root@chaitanyaoracledba]# yum repolist


18. List All Enabled or Disabled Yum Repositories


The below will display the enable or disable yum repositories in your system 


 [root@chaitanyaoracledba]# yum repolist all


19. Install a Package from Specific Repository


To install a particular package from specific enabled or disabled repository you must use the enablerepo option in your yum command


[root@chaitanyaoracledba]# yum --enablerepo =epel install phpmyadmin


20. Interactive Yum Shell


Yum utility provides a custom shell where you can execute multiple commands


[root@chaitanyaoracledba]# yum shell


21. Clean Yum cache


By default yum keeps all the repository enabled package data in /var/cache/yum/ with each sub directory,To clean all cached files from enabled repository you need to run the following command regularly to clean up all the cache and make sure that there is nothing unnecessary space is using, the below command is used


[root@chaitanyaoracledba]# yum clean all


22. View History of Yum


To view all the past transactions of yum command ,just below type the command


[root@chaitanyaoracledba]# yum history


Note : Info on YUM Package Management it may be differ in your environment like production,testing,development and naming conventions etc,


THANKS FOR VIEWING MY BLOG FOR MORE UPDATES FOLLOW ME AND SUBSCRIBE ME


Tuesday, September 22, 2020

RPM Package Management

RPM Package Management


Introduction:


In this blog i am going to explain RPM Package Management, RPM is a default open source and most popular package management utility for Red Hat based systems like RHEL,CENTOS and FEDORA)

The Red Hat Enterprise linux system divided into RPM packages which can be installed ,upgraded or removed,all softwares on a Red Hat Enterprise linux system is divided into RPM packages

The tool allows linux system administrators and users to install,update,uninstall,query,verify and manage system software packages in unix/linux operating systems.RPM package file name will be .rpm

.rpm file that includes compiled software programs and libraries needed by the packages,


RPM Package Management,rpm package,rpm package download,rpm linux command,how to create rpm package in redhat linux,location of rpm packages in linux,how to verify rpm package,rpm file,rpm install,how to check dependencies of rpm package before installing,rpm package manager,redhat package manager


  •    RPM is a free and easily downloaded from rpm sites ,released under the  GPL(General public Licence)    
  •    RPM keeps the information of all the installed packages under this directory /var/lib/rpm database
  •    RPM is the only way to install under the linux/unix systems to update the packages
  •    RPM deals with the .rpm file swhich contains the information about the packages such as dependies info,version info


There are five commands mostly  used in linux/unix for  RPM Package Management


  1. Install : it is used to install any RPM package .rpm file
  2. Remove:it is used to remove or uninstall the RPM packages
  3. Upgrade: it is used to upgrade the existing RPM package in linux/unix systems
  4. Verify : it is used to verify the RPM packages in linux/unix systems
  5. Query:it is used to query any RPM package


Below are the websites you can find and download  RPM Package Management


https://rpmfind.net/

https://www.redhat.com/en

https://rpm.org/download.html


Now Let us start the process  RPM Package Management


RPM is a popular utility for installing software on unix/linux systems


Step 1: Log in as root user on which you want to install the software you can manage the RPM commands by using root user privileges


Step 2: Download the RPM package you wish to install the package named some thing like java rpmpackage name  jre-8u111-linux-i586.rpm,the file name include version (1.0,8), release(1,u111) and architecture is (i386,i586)


Step 3: Check the PGP signature of packages before installing them on your linux systems make sure the integerity and origin is correct by using the following command  checksig(check signature)option to check signature of a package called pidgin


[root@chaitanyaoracledba]# rpm --checksig jre-8u111-linux-i586.rpm


jre-8u111-linux-i586.rpm: rsa sha1 (md5) pgp md5 OK


INSTALL A PACKAGE


[root@chaitanyaoracledba]# rpm - Uvh jre-8u111-linux-i586.rpm


Preparing...                ########################################### [100%]

   1:jre1.80_111           ########################################### [100%]


RPM commands and options


  •     -i : install a package
  •     -v : verbose for a nicer display of package
  •     -h: print hash marks as the package archive is unpacked.


If a package with same name and version is already installed below output will show like this


[root@chaitanyaoracledba]# rpm - Uvh jre-8u111-linux-i586.rpm


Preparing...                ########################################### [100%]

           package jre1.8.0_111-1.8.0_111-fcs.i586 is already installed


However if you want to install the package anyway, youcanuse --replacepkgs option 


[root@chaitanyaoracledba]# rpm - ivh --replacepkgs jre-8u111-linux-i586.rpm

Preparing...                ########################################### [100%]

   1:jre1.8.0_111           ########################################### [100%]


 Force, option which tells RPM to ignore the error  


[root@chaitanyaoracledba]# rpm - ivh jre-8u111-linux-i586.rpm -- force

Preparing...                ########################################### [100%]

   1:jre1.8.0_111           ########################################### [100%]


If you attempt to install a package that contains a file which already been installed by another package below output show like this


[root@chaitanyaoracledba]# rpm-Uvh foo-1.0-1.i386.rpm

Preparing... ...               ########################################### [100%]

file   /usr/bin/foo from install of foo-1.0-1 conflicts with file from package bar-2.0.20


To make RPM ignore this error ,use the replacefiles option


[root@chaitanyaoracledba]# rpm-ivh--replacefiles  foo-1.0-1.i386.rpm


RPM packages may sometimes depend on other packages which requires other packages to be installed on the linux/unix system 


if u try to install a package which has an unresolved dependency package the below output shows like this


error : Failed dependencies:

bar.so.2 is needed by foo-1.0-1

suggested resolutions:

bar-2.0.20-.i386.rpm


If you are installing a pacakage ,it usually suggest the package needed to resolve the dependency


Download suggested packages from redhat sites and add it to the command


rpm -ivh foo-1.0-1.i386.rpm bar-2.0.20-3.i386.rpm


if both the packages are installed sucessfully it will show like this 


Preparing... ...               ########################################### [100%]  


                1:foo  ########################################### [100%]  

                2 :bar ########################################### [100%]  


if it does not suggest a package to resolve the dependency ,you cantry the --redhatproviders option to determine which package contains the required file


[root@chaitanyaoracledba]# rpm -q --redhatproviders bar.so.2


you need the rpmdb-redhat package installed to use this option


bar-2.0.20-3.i386.rpm


To force the installtion anyway,use the -nodeps option


[root@chaitanyaoracledba]# rpm-ivh  foo-1.0-1.i386.rpm --nodeps


UNINSTALL  A PACKAGE


To remove the uninstall package use the - erase option


[root@chaitanyaoracledba]# rpm - e jre1.8.0_111


UPGRADE A PACKAGE


To upgarde the package  RPM automatically uninstalls any old versions use the -U option  will install a package when there are no previous versions of the package installed 


[root@chaitanyaoracledba]# rpm - Uvh jre-8u111-linux-i586.rpm


FRESHENING A PACKAGE


Freshning a package similar to upgrading except that only existing packages are upgraded below is the command


[root@chaitanyaoracledba]# rpm - Fvh jre-8u111-linux-i586.rpm


QUERY DATABASE


To query this database use the -q option ,The rpm -q  package name command displays the package name,version,and relese number of the installed package name


 [root@chaitanyaoracledba]# rpm -q jre1.8.0_111

                                                 jre1.8.0_111-1.8.0_111-fcs.i586


Check all the installed package on the system


[root@chaitanyaoracledba]# rpm -qa


check whether particular package is installed or not


[root@chaitanyaoracledba]# rpm -q jre1.8.0_111

                                                 jre1.8.0_111-1.8.0_111-fcs.i586


Check a package is consistent or not before installing it


[root@chaitanyaoracledba]# rpm -ivh --test jre-8u111-linux-1586.rpm


       Preparing...                ########################################### [100%]


To see the information about the installated package use below command to show


[root@chaitanyaoracledba]# rpm -qi jre1.8.0_111


To see the configuration file of the installed package use below command to show


[root@chaitanyaoracledba]# rpm -qlc jre1.8.0_111


To see the directory with which a particular package is associated


[root@chaitanyaoracledba]# rpm -qld jre1.8.0_111


Note : Info on RPM Package Management it may be differ on your environment like development,testing,production and naming conventions etc


THANKS FOR VIEWING MY BLOG FOR MORE UPDATES FOLLOW ME AND SUBSCRIBE ME


Friday, September 18, 2020

ASH Report in Oracle

 ASH Report in Oracle


Introduction


The ASH Report in Oracle contains recent information on active sessions sampled every second,The AWR and ADDM report will taken every one hour genetates and one hour old report will not generate and will not help in diagnosis issues that are in the current database


The ASH Report in Oracle report is an integral part of the oracle database self-management framework and is extremely useful for diagnosing performance problems


ASH Report in Oracle,difference between awr and ash report,oracle ash report,generate ash report,ash report analysis,awr and ash report in oracle,generate ash report for sql_id,awr addm ash reports,awr ash and addm reports,generate ash report in oem 12c,ash oracle 12c,ash report in oracle 11g,ash report in oracle 12c rac


The ASH Report in Oracle gathers sampled data at the session level rather than at the instance level by capturing statastics for only active sessions ,ASH report collects a manageable set of data


ASH Report in Oracle these are the parameters below are the following


  • SQL identifier of a SQL statement

  • Object number,file number,and block number

  • Wait event identifier and parameters

  • Session identifier and session serial number

  • Module and action name

  • Client identifier of the session


Let us start the process


In this blog i am going to explain ASH Report in Oracle  in single instance database and Rac database and also i am going to tell detailed in ASH report manually 

The AWR and ADDM report will taken every one hour genetates Report

Here i am using  ORCL database and ORCL instance in this example


The ashrpt.sql SQL script generates an HTML or text report that displays ASH information for a specified duration.


To generate an ASH report:


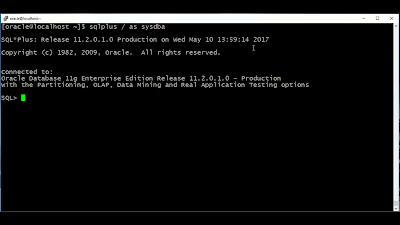
Login to sqlplus / as sysdba


Step 1: At the SQL prompt, enter:


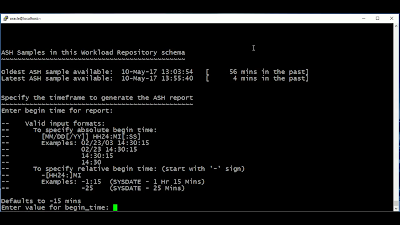
SQL>@$ORACLE_HOME/rdbms/admin/ashrpt.sql


or 


SQL@?/rdbms/admin/ashrpt.sql

ASH Report in Oracle,difference between awr and ash report,oracle ash report,generate ash report,ash report analysis,awr and ash report in oracle,generate ash report for sql_id,awr addm ash reports,awr ash and addm reports,generate ash report in oem 12c,ash oracle 12c,ash report in oracle 11g,ash report in oracle 12c rac

ASH Report in Oracle,difference between awr and ash report,oracle ash report,generate ash report,ash report analysis,awr and ash report in oracle,generate ash report for sql_id,awr addm ash reports,awr ash and addm reports,generate ash report in oem 12c,ash oracle 12c,ash report in oracle 11g,ash report in oracle 12c rac


ASH Report in Oracle,difference between awr and ash report,oracle ash report,generate ash report,ash report analysis,awr and ash report in oracle,generate ash report for sql_id,awr addm ash reports,awr ash and addm reports,generate ash report in oem 12c,ash oracle 12c,ash report in oracle 11g,ash report in oracle 12c rac


Step 2.: Specify whether you want an HTML or a text report:

ASH Report in Oracle,difference between awr and ash report,oracle ash report,generate ash report,ash report analysis,awr and ash report in oracle,generate ash report for sql_id,awr addm ash reports,awr ash and addm reports,generate ash report in oem 12c,ash oracle 12c,ash report in oracle 11g,ash report in oracle 12c rac

ASH Report in Oracle,difference between awr and ash report,oracle ash report,generate ash report,ash report analysis,awr and ash report in oracle,generate ash report for sql_id,awr addm ash reports,awr ash and addm reports,generate ash report in oem 12c,ash oracle 12c,ash report in oracle 11g,ash report in oracle 12c rac

ASH Report in Oracle,difference between awr and ash report,oracle ash report,generate ash report,ash report analysis,awr and ash report in oracle,generate ash report for sql_id,awr addm ash reports,awr ash and addm reports,generate ash report in oem 12c,ash oracle 12c,ash report in oracle 11g,ash report in oracle 12c rac


Enter value for report_type: html


In this example, a html report is chosen.


Step 3:. Specify the begin time in minutes before the system date:


ASH Report in Oracle,ash report generation,ash report analysis,ash report for rac,ash report vs awr report,ash_report_analytics,ash report activity over time,ash report for a particular session,what is a ash report,ash report analysis in oracle 11g,generate ash report in oem 12c

ASH Report in Oracle,ash report generation,ash report analysis,ash report for rac,ash report vs awr report,ash_report_analytics,ash report activity over time,ash report for a particular session,what is a ash report,ash report analysis in oracle 11g,generate ash report in oem 12c

ASH Report in Oracle,ash report generation,ash report analysis,ash report for rac,ash report vs awr report,ash_report_analytics,ash report activity over time,ash report for a particular session,what is a ash report,ash report analysis in oracle 11g,generate ash report in oem 12c


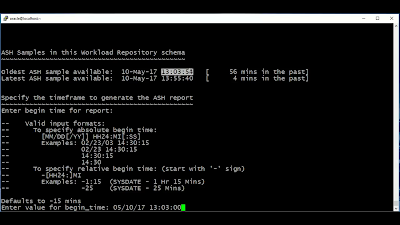
Enter value for begin_time: -10


In this example, 10 minutes before the current time is selected.


Step 4.: Enter the duration in minutes that the report for which you want to capture ASH information from the begin time.

ASH Report in Oracle,ash report generation,ash report analysis,ash report for rac,ash report vs awr report,ash_report_analytics,ash report activity over time,ash report for a particular session,what is a ash report,ash report analysis in oracle 11g,generate ash report in oem 12c

ASH Report in Oracle,ash report generation,ash report analysis,ash report for rac,ash report vs awr report,ash_report_analytics,ash report activity over time,ash report for a particular session,what is a ash report,ash report analysis in oracle 11g,generate ash report in oem 12c

ASH Report in Oracle,ash report generation,ash report analysis,ash report for rac,ash report vs awr report,ash_report_analytics,ash report activity over time,ash report for a particular session,what is a ash report,ash report analysis in oracle 11g,generate ash report in oem 12c


Enter value for duration:


In this example, the default duration of system date minus begin time is accepted.


Step 5: Specify the Report  name, or accept the default report name:

ASH Report in Oracle,ash report generation,ash report analysis,ash report for rac,ash report vs awr report,ash_report_analytics,ash report activity over time,ash report for a particular session,what is a ash report,ash report analysis in oracle 11g,generate ash report in oem 12c

ASH Report in Oracle,ash report generation,ash report analysis,ash report for rac,ash report vs awr report,ash_report_analytics,ash report activity over time,ash report for a particular session,what is a ash report,ash report analysis in oracle 11g,generate ash report in oem 12c


Enter value for report_name:

Using the report name : / u01/ash.html


In this example, ASH report ash.html is generated. The report will gather ASH information beginning from 10 minutes before the current time and ending at the current time.


To generate an ASH report in an Oracle RAC environment:


Step1: At the SQL prompt, enter:


SQL@$ORACLE_HOME/rdbms/admin/ashrpti.sql


Step2: Specify whether you want an HTML or a text report:


Enter value for report_type: html


In this example, an HTML report is chosen.


Step 3: A list of available database IDs and instance numbers are displayed:


Instances in this Workload Repository schema


DB Id         Inst Num   DB Name      Instance Host

----------- -------- ------------ ------------ ------------

2206262418 2    ORCLorcl localhost1660

2206262418 1    OMALL341 omallt341 cha341

2206262418 2    OMALL341 omallt342 cha342

2206262418 3   OMALL341 omallt343 cha343

2206262418 4    OMALL341 omallt344 cha344


Enter the values for the database identifier (dbid) and instance number (inst_num):


Enter value for dbid: 2206262418

Using database id: 2206262418

Enter instance numbers. Enter 'ALL' for all instances in an Oracle

RAC cluster or explicitly specify list of instances (e.g., 1,2,3).

Defaults to current instance.

Enter value for inst_num: ALL

Using instance number(s): ALL


Step 4: Specify the begin time in minutes before the system date:


Enter value for begin_time: -1:10


In this example, 1 hour and 10 minutes before the current time is selected.


Step 5:. Enter the duration in minutes that the report for which you want to capture ASH information from the begin time:


Enter value for duration: 10


In this example, the duration is set to 10 minutes.


Step 6:. Specify the slot width in seconds that will be used in the Activity Over Time section of the report:


Enter value for slot_width:


In this example, the default value is accepted.


Step 7: Follow the instructions as explained in the subsequent prompts and enter values for the following report targets:


* target_session_id

* target_sql_id

* target_wait_class

* target_service_hash

* target_module_name

* target_action_name

* target_client_id

* target_plsql_entry


Step 8: Enter a report name, or accept the default report name:


Enter value for report_name:

Using the report name ashrpt_rac_0210_0232.txt


In this example, the default name is accepted and an ASH report named ashrpt_rac_0210_0232 is generated. The report will gather ASH information on all instances belonging to the database with a database ID value of 2206262418 beginning from 10 minutes before the current time and ending at the current time.


Note: Info on ASH Report in Oracle itmay be differ in your environment like production,testing,development etc


THANKS FOR VIEWING MY BLOG FOR MORE UPDATES FOLLOW ME OR SUBSCRIBE ME


Saturday, September 12, 2020

Linux Commands Tutorial

 Linux Commands Tutorial


Introduction:In this Blog i am going to explain  Linux Commands Tutorial  Linux is a Unix-Like operating system. All the Linux/Unix commands are run in the terminal provided by the Linux system. This terminal is just like the command prompt of Windows OS. Linux/Unix commands are case-sensitive. The terminal can be used to accomplish all Administrative tasks


Let us Start the Process Linux Commands Tutorial


1)logname: It shows current username


# logname


2)pwd: Present working directory which means current folder in linux


# pwd


3)date: it display system date and time


# date


4)clear: to clear the screen


 # clear


5)cal: current month calendar we can call month and year along with cal command  ex: cal 5 1982  which displays may month 1982


 # cal


6)uname:  it dispalys the present os name.


 # uname


7)uname -r:  displays kernal version


# uname -r


8)hostname: displays server name


 # hostname


9)hostname -i: display server ip address


# hostname -i


10)who: it shows list  of connect user in that server


# who


11)who am i:  current logged user info


# who am i 


12)su:  switch username from one user into another user   ex:su - username(oracle is the username)


 # su - oracle 


13)exit:  logout from current user logged in


 # exit


14)man command name: help of the given command


# man


WORKING WITH FILES:


1)cat:  which is use to create a new file or open to  view existing files


# cat chaitanya.txt


2)cat>>filename: appending data to these file


# cat >> chaitanya.txt


3)$touch filename: which  create an empty file with zero kb


# touch chaitanya.txt


FILE DELETION:


 1)rm: to delete the file


# rm chaitanya1.txt


 2)rm -rf: delete the files forcibly 


# rm - rf chaitanya2.txt


 3)rm -i: delete the file which asks the  user conformation 


 # rm - i chaitanya.txt


 4)rm file1 file2: deleting multiple files


# rm chaitanya1.txt  chaitanya2.txt


WORKING WITH DIRECTORIES:


1)mkdir: To create a new directory (Directory is  nothing  but a drive or folders like windows) in linux (here i am using  Linux Commands Tutorial chaitanya is the directory name)


 # mkdir chaitanya  


2)cd dirname: to change a directory (one directory to another directory)


# cd orabackup


3)cd .. : to moves from  current directory into previous directory


# cd ..


4)cd: to come out entire directory


#  cd 


5)cd /: it changes the root directory


# cd /


REMOVING DIRECTORIES:


1)rmdir: to removing directory it must be empty( here i am using Linux Commands Tutorial chaitanya is the directory in that chaitanya directory it should be empty then only it will be deleted)


# rmdir chaitanya


2)rm -r direcname: it deletes recursively to entire structure


# rm - r chaitanya


3)rm -ri direcname: it deletes recursively to entire structure it will ask the user confirmation (here iam using  Linux Commands Tutorial chaitanya is the directory)


 # rm - ri


4)rm -rf direcname: it deletes recursively to entire structure with forcibly


# rm -rf


COPY COMMANDS


1)cp sourcefile targetfile: copying file from existing location into  new location


# cp chaitanya1.txt   chaitanya3.txt


# cp chaitanya3.doc  chaitanya03new.doc


# ls - l * .doc( it will displays all doc related files)


# ls - l *.txt (it will displays all text related files)


COPY MULTIPLE FILES SIMULTANEUOSLY INTO ANOTHER DIRECTORY


# cp main.txt demo.txt libc.txt     backup


If backup is located in /home/project, enter:


#  cp main.txt demo.txt libc.txt     /home/project backup


COPY A FILE TO ANOTHER DIRECTORY  


To copy a file from your current directory into another directory called /tmp/, 


# cp filename /tmp

# ls /tmp/filename

# cd /tmp

# ls


COPYING ALL FILES


The star wildcard represents anything i.e. all files. To copy all the files in a directory to a new directory, enter:


# cp *  /u01/oracle/backup


The star wildcard represents anything whose name ends with the .doc extension. So, to copy all the document files (*.doc) in a directory to a new directory, enter:


# cp *.doc  /u01/oracle/backup


To copy a directory, including all its files and subdirectories, to another directory, enter (copy directories recursively):


# cp -R *  /u01/oracle/backup


To copy a file to a new file and preserve the modification date, time, and access control list associated with the source file, enter:


# cp -p chaitanya.txt  /dir1/dir2/

$ cp -p filename /path/to/new/location/myfile


MOVING COMMANDS


1)mv old file newlocation: using these command we can move a file from one folder into  another  folder or we can rename file also


Move mainc.txt defh.txt  files to /u01/oracle/oracbackup/ directory:


# mv mainc.txt defh.txt   /u01/oracle/orabackup/


Move all C files in current directory to subdirectory orabackup :


# mv *.c orabackup


Move all files in subdirectory orabackup to current directory :


# mv orabackup/* .


Rename file main.c to main.backup:


# mv main.c main.backup


Rename directory bak to bak3:


# mv bak bak3


Update - move when main.c is newer:


# mv -u main.c bak

#


Move main.c and prompt before overwrite bak/main.c:


# mv -v main.c bak

'bak/main.c' -> 'bak/main.c'

#


VIEWING FILE COMMANDS


1)ls : it's listing files which are in that directory with  ascending order


# ls


2)ls -a: listed all files including  hidden files also


# ls -a 


3)ls -l: listed all files in long list  format i.e 9 field


# ls -1


4)ls -t: listed all files based on date and time of creation


# ls -t


5)ls -r: listed all files on descending order or sin reverse


# ls -r


6)ls -R: listed all files recursively


# ls -R


CREATING HIDDEN FILES


1)cat>.filename


# cat > .chaitanya9.txt


2)mv filename .filename


# mv chaitanya1.txt  .chaitanya6.txt


3)mkdir .dirname


# mkdir  .chaitanya


UNHIDE FILES


1)mv .chaitanya chaitanya


# mv  .chaitanya chaitanya


2)mv .dirname dirname


# mv . chaitanya chaitanya


Note: Info on  Linux Commands Tutorial it may be differ in your environment like production,testing development and naming conventions etc


THANKS FOR VIEWING MY BLOG FOR MORE UPDATES FOLLOW ME OR SUBSCRIBE ME

ITIL Process

ITIL Process Introduction In this Blog i am going to explain  ITIL Process, ITIL stands for Information Technology Infrastructure Library ...